PEAX Equipment

Euro mount pronghorn?

gwhunter

Well-known member
Joined
Jun 16, 2014
Messages
760
Location
Michigan
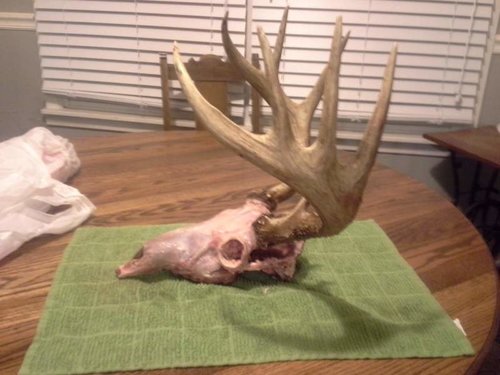
After reading the bugs vs. bury threads and seeing Buzz's foolproof instructions for boiling and cleaning the head I think I am back on the bandwagon for doing it myself instead of sending it out to a taxi to get it done. My only question is what do you have to do to the "sheathes"? I've heard that you have to do something special to them because there is tissue underneath them? I was gonna boil the head right when I got home and stick it on the wall (without doing anything to the horns) and now I'm glad I didn't :eek:. This is a flatlander's first time with a pronghorn and I don't want to mess up with the wife by hanging a mount on the wall the ends up stinkin up the house.

I've searched the threads on HT but can't seem to find a step by step to figuring out a diy euro mount. Anyone have a link they would like to share?

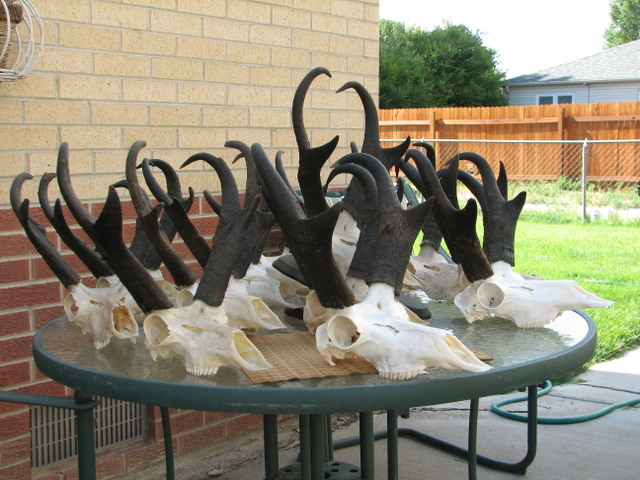
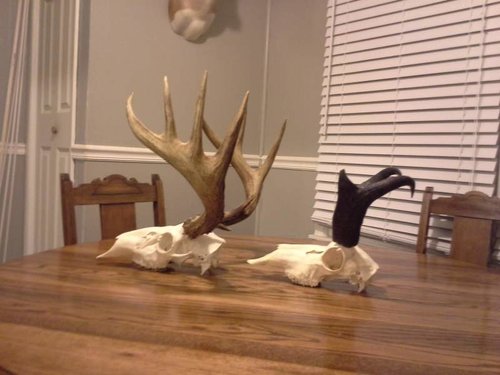
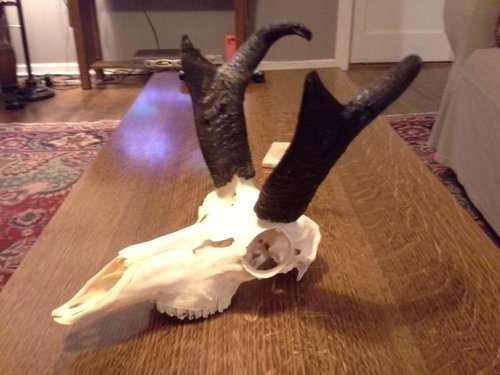
p.s. Buzz, those euro pronghorn mounts look awesome!
 
if you boil them with oxi clean with the rest of the skull they pull right off of the extra skin or whatever it is that attaches them to the skull
 
Does that mean I submerge the horns in the water while boiling the skull in order to "soften" them up? What do I do to clean them once they are off? I googled these questions and it seems everyone has an answer to the question but none of them are the same.
 
Yes, submerge the horns and they should pull off after 15-20 minutes in the water. After taking a tooth brush and soap to the sheaths, I let them sit in Borax for a couple days and epoxy or Gorilla glue them to the skull after rinsing them and letting them dry for a day or two. A light coating of WD-40 gives them a nice finish.
 
I've done several Pronghorn and I had good luck placing them in a sealed plastic bag for a week or so with a little water splashed in. I do this prior to simmering the skull to clean it up.
After a week the sheathes usually pull right off. Kind of stinky but you do not damage the sheathes any in the process. Once they pull of you just need to clean the tissue off the bones to clean it up. I then use auto bondo to reattach the sheaths.
 
If you want the sheaths to be located on the cleaned skull the same way they were on the animal while alive, you may want to drill a SMALL hole on both the inside and outside location of each horn base for alignment when remounting because once the hide is removed from the horn base, they will sit flush with the skull instead of up a short distance as they did prior to the skull being cleaned. If that isn't a big deal to you then just eyeball it and call it good,
 
If you want the sheaths to be located on the cleaned skull the same way they were on the animal while alive, you may want to drill a SMALL hole on both the inside and outside location of each horn base for alignment when remounting because once the hide is removed from the horn base, they will sit flush with the skull instead of up a short distance as they did prior to the skull being cleaned. If that isn't a big deal to you then just eyeball it and call it good,

You area supposed to space them out to make the antelope look bigger.
 
Here's what Bwana is referring to, look at the two closest of these:

IMG_3661.JPG


The one in the front, the horns are set about perfect in relation to the eye socket. The one directly behind it, the horns are set too low.

Its not that big of a deal, but I like them to be off the eye sockets by 3/4-1" give or take.

Its not that they look any bigger, they just look more correct, IMO.
 
Thanks guys for all the help! The head is in the water as we speak. I'll post pictures of the finished product :)
 
Microwave the head for about 3 minutes. The horns pop right off. Clean the skull and shave off the cartilage on the "daggers". Dust the inside of the horn caps with a borax/alum preservative. Then glue the horns back on with horn glue or other adhesive.
 
I've been simmering at about 190-200ish for the last couple of hours. The sheaths took about 45 minutes but I got them off. I used a small drill bit to mark the back side of the horns and figure I will use a toothpick to line them back up. I originally eyeballed the sal-soda and apparently used too much since it boiled over about double so I dumped out some of the water and added fresh. I am gonna take it out in about an hour or so and wait until tomorrow to do the "degreasing" simmer like Buzz talked about.
 
http://www.skullsite.com/misc/macerationmanual.htm

I used the maceration technique on a couple of skulls last summer. Only supplies you will need are borax, hydrogen peroxide, and a degreaser. After submerging the skull in water the sheaths will slip off in a week or so. Then clean the inside and put in a bag with borax. This will bug proof it and deodorize it. When the skull is clean, degrease it with dawn or with super solvent from vandykes, then whiten with hydrogen peroxide from the beauty supply store. If any teeth are loose glue them in.
 
Heres a few pics. One of my deer before it went in the bucket. I went overboard cleaning the skull, no need to get as much off of them. Get the eyes and as much of the brain out as possible. Took about 2 weeks before I rinsed them and degreased, but that was in the summer.
 

Attachments

  • 20140812_202344.jpg
    20140812_202344.jpg
    47 KB · Views: 340
  • 20140914_192911.jpg
    20140914_192911.jpg
    44.1 KB · Views: 341
  • 20140810_201051.jpg
    20140810_201051.jpg
    45.7 KB · Views: 341
Those look good! It's taking me a bit longer than I anticipated since I only have a couple hours to work on it after I get home from work. It's in the pot degreasing right now so I should be able to apply the whitening agent tomorrow when I get home. I don't have a camera and my phone is an 8 year old flip phone so I can't post pictures from it. I started this when my wife was out of town (for obvious reasons) so I'll use my wife's Iphone to post pictures once it is all done.
 
Back
Top