Remington 700 Build

Crash87

Active member
Joined
Oct 6, 2019
Messages
65
Location
Alexandria, Virginia
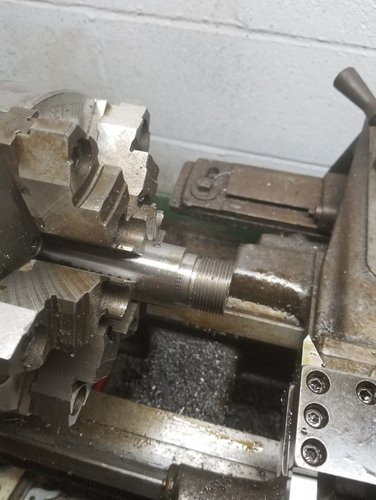
Team - if you saw my thread over on backpack hunting it was about getting suggestions for gear after my whole rig was ripped off on the way home from Colorado last fall. In there I relayed I was building a rifle to replace the ones stolen and was asked to post a thread on it. I will try over the course of this to relay what I do to build rifles and get them shooting well.
For this build I went with a Remington 700 Long Action Magnum receiver for the 338 Win Mag cartridge. Scope is a Vortex Viper PST. Stock is a Hogue full bedded varmint version. Timney trigger and a Shilen select match Sendero contour. Apologies for the messy bench! More to follow.
00 The parts with receiver ready to machine.jpg
 
That’s a hefty barrel. How long do you plan on making it?
Also what is a crown saver?
 
Hi! Yup, like to use heavy barrels on 338s as they seem to tame harmonics better...could also be because I have more strength than brains and like a heavier rifle on the 338 for recoil/control. Rifles normally take a couple days of machining, a good day to bed the barrel/recoil lug/receiver joint, and a day final fitting. This one is nearly done and I will post pics on the process. The Crown Savers are one time use fittings for the lathe tailstock live center. They keep the center from marring a crown, or as I use them, for machining the bolt. Will start posting!
 
In the parts pictured above you see the receiver with a mandrel and an action truing sleeve. The mandrel is mounted between centers and the outside of the truing sleeve is, well, trued so that the receiver can then be placed in the chuck to precisely machine the receiver face and lugs as well as true the receiver threads. This is critical to getting the accuracy right as it evens out the tolerances from the factory and makes all parallel things parallel and all things perpendicular truly perpendicular.
00a Receiver in the mandrel and sleeve.jpg

Once the receiver is machined I mount the stripped bolt between centers with a crown saver on the tailstock live center to keep the firing pin hole from being marred. There are other bolt truing fixtures out there, but this method has served me well over the years. Truing the bolt matches the lug surfaces to those in the receiver for a square purchase and aligned to the threads. I also true the bolt face to better allow me to measure headspace dimensions later in the process. This process, like most lathe processes, takes a longer time to set up the piece than it does to do the machining but it is again, critical to the final accuracy. I know it is not truly between centers as I use the chuck to hold the rear. Notice there is a truing fixture screwed into the back of the bolt to allow precise mounting. The amount taken off the lug faces and tip is only a couple thousandths and that gets it square and true. This process and the one for the receiver are referred to as 'blueprinting the action'. Some place a lot of mystery on this but it is simple machining with great patience to set up the cuts.
0 Machining the Bolt Lugs and Tip.jpg
 
With the action trued I move on to the barrel machining. This involves mounting the barrel blank through the headstock and dialing it in for a true turn. I have a four screw chuck on the other end of the headstock and use two dial indicators with caliber specific range rods to get it as close to zero as possible. Again, this step is critical to getting the barrel machined and allowing its true accuracy to be revealed when it is mated to the trued receiver. Different smiths do this process in different order of steps. My process is: square the chamber end face; cut the major shank diameter to the recoil lug dimensions ( I use a Holland's competition recoil lug); and thread the shank. Some smiths cut the chamber before threading but I chamber after. Since I mount through the headstock vice between centers I find it easier to do it all on a single setup and minimize setup variation tolerance.
1 Facing the barrel blank.jpg2 cutting major diameter.jpg3 threading the barrel shank.jpg4 hand fitting the receiver.jpg
 

Attachments

  • 5 Threads complete.jpg
    5 Threads complete.jpg
    297.8 KB · Views: 7
You’re tougher than I am. After 13 years I’m finally ditching the sendero contour. Going to a sub 10lb gun, I Can’t pack a heavy rifle anymore. Looks like your build is going well, I look forward to seeing the end product. 🔫
 
You’re tougher than I am. After 13 years I’m finally ditching the sendero contour. Going to a sub 10lb gun, I Can’t pack a heavy rifle anymore. Looks like your build is going well, I look forward to seeing the end product. 🔫

My Remington 700 .308Win with a 24” Sendero contour is under 10lbs scoped.
 
You’re tougher than I am. After 13 years I’m finally ditching the sendero contour. Going to a sub 10lb gun, I Can’t pack a heavy rifle anymore. Looks like your build is going well, I look forward to seeing the end product. 🔫
Not sure about tougher! I like my 7mm08 mauser build which is a 5 contour and fun to carry. For elk I seem stuck on the 338 Win Mag though.
 
Moving on to chambering. Cutting the chamber requires that same attention to detail and setup as well as a good reamer. I used a Manson reamer for this one but have used Clymer before also. This cut also involves headspacing the chamber to safe standards. Which reminds me I should go over how to dimension build to render the correct headspace. A 338 Win Mag headspaces from the belt and good Go and No Go gauges are used to assess it. When planning a build I use a standard approach to dimensioning the blank to the correct headspace. This helps to avoid chasing dimensions during machining. To help with the math I use the below form with measurements direct from the receiver/bolt. These measurements will take into account the trued action and bolt for the correct headspace dimensions. I use a digital depth gauge and measure to thousandth. It is important to remember there will be a crush depth when tightening the barrel to the receiver. This will involve crush surfaces of the recoil lug, barrel shoulder, and receiver face. This must be included in the calculation as it is on mere thousandths between a Go and No Go headspace result.
Dimensioning Chart_700.jpg

Now to chambering. I use a Manson floating reamer holder to allow for any alignment imperfections. This delivers a precise chamber cut, which some argue is the heart of a rifles accuracy. To me it is every step along the way that builds that accuracy, but a sloppy chamber will result in overworked brass from firing. Not a big deal unless you reload and then case head separations and neck tears can start appearing. The chamber cut is done in no more than a 10 thousandths plunge with repeated cutting oil applied. Cutting more takes less time but can result in a burr or a rolled chip that can scratch the chamber.

6 starting chamber reaming.jpg7 chambering almost there.jpg8 checking headspace.jpg

With headspace checked and good the barrel is swapped to present the crown for machining. The barrel is dial indicated the same as previously mentioned and an 11 degree crown is recessed into the barrel exit. This is also the time when you can thread the barrel for brakes or whatever the client wants attached. I do not use a brake so left the barrel end unthreaded. The crown is of course critical to accuracy as the bullet must exit evenly in front of the gas pillar or it can be upset and tumbled leaving an otherwise accurate build not printing correctly. In the field I always carry a marble and cutting paste in case the crown gets dinged. I saved a hunt once when a buddy's rifle slipped and cut the crown on a rock.

9 cutting the crown.jpg
10 Crown complete.jpg

With this the machining is complete and the rifle is assembled, fitted, polished, and surface treated. I am at a halt for now as I am waiting for back ordered BDL bottom metal. Once the bottom metal comes in I will continue with polishing, treating and bedding. Once that is complete will mount the scope get to the range. More to follow!
 
Hi! Yup, like to use heavy barrels on 338s as they seem to tame harmonics better...could also be because I have more strength than brains and like a heavier rifle on the 338 for recoil/control. Rifles normally take a couple days of machining, a good day to bed the barrel/recoil lug/receiver joint, and a day final fitting. This one is nearly done and I will post pics on the process. The Crown Savers are one time use fittings for the lathe tailstock live center. They keep the center from marring a crown, or as I use them, for machining the bolt. Will start posting!
I apologise for missing your real question. I thought you meant build time but now think it was length of the barrel. The blank comes in at 28 inches and it is recommended to cut an inch off each end to remove machine marks. This barrel ended up at 25.5"
 
Great write up!!
Do you ever time the bolt handle after cutting lugs and lug abutments?
 

Latest posts

Forum statistics

Threads
111,060
Messages
1,945,444
Members
35,001
Latest member
samcarp
Back
Top