Navigation
Install the app
How to install the app on iOS
Follow along with the video below to see how to install our site as a web app on your home screen.
Note: This feature may not be available in some browsers.
More options
You are using an out of date browser. It may not display this or other websites correctly.
You should upgrade or use an alternative browser.
You should upgrade or use an alternative browser.
How do I fix this?
- Thread starter Djfan
- Start date
Djfan
Well-known member
perma
Well-known member
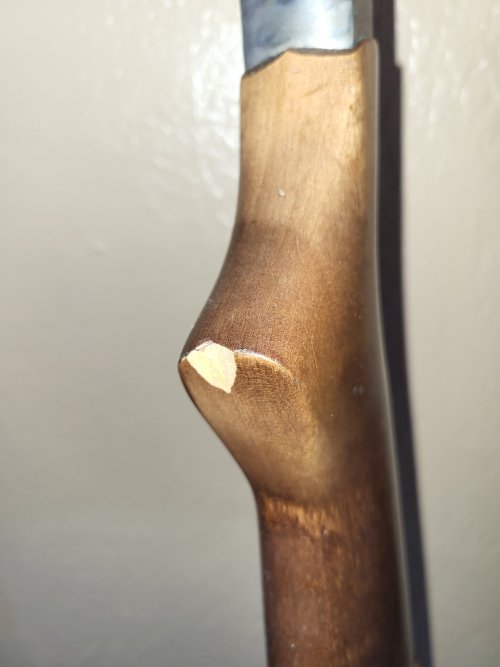
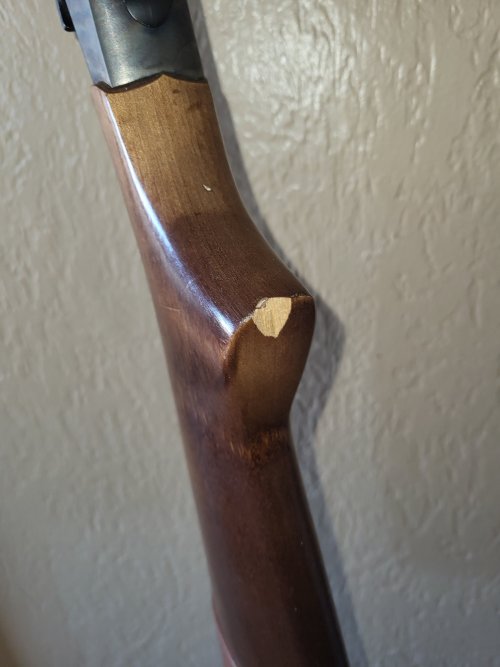
Wood filler would be my guess. Unless you have the chip that broke off, then wood glue.
buffybr
Well-known member
1. Best option would be to glue (epoxy) the chip back on, but you probably don't have the chip.
2. Cut the base of the pistol grip off to the depth of the chip, contour and sand the edges, then stain it to match the rest of the stock.
3. Find a stain that matches the stock, mix enough sawdust, epoxy, and stain to fill the hole, then sand the patch smooth and stain the repair area.
2. Cut the base of the pistol grip off to the depth of the chip, contour and sand the edges, then stain it to match the rest of the stock.
3. Find a stain that matches the stock, mix enough sawdust, epoxy, and stain to fill the hole, then sand the patch smooth and stain the repair area.
44hunter45
Well-known member
Check Numrich Arm (Gun Parts Corp) to see if they have a complete butt stock take off. I've had good luck with this.
Having said that, I am a woodworker and luthier. Here is my process for a guitar repair.
Before I explain this, the caveat is to always practice the techniques on some scrap wood until you are confident enough to try it on an heirloom or expensive client instrument or gun.
I would get a piece of matching scrap. This is birch in your pictures. You can get birch ply almost anywhere. Use a fine saw or medium file to make enough sawdust. Mix that sawdust with superglue on a disposable surface. Be careful because it will get hot from the chemical reaction. Like a surgeon doing surgery, mask off everything. I mean the whole piece. Finish your masking with cutting in the last piece of tape right over the chip. You will remove only this piece after you apply the mixture. Fill the taped off area carefully with your mixed glue. and remove the tape before it sets.
This stuff hardens fast, so have your work piece masked off and ready to apply the fill before you start mixing. I like to use a loose utility knife blade to apply the patch. Whatever you use will likely be toast after this.
Allow 24 hours cure. Take a one sided razor blade or utility knife blade and burr the edge by running it over a metal surface in one direction. Scraping a superglue patch gives you more control than sanding. If you are really good with a file this works. You don't want to rush this step. Go slowly and carefully. You want to get close to level with the original, but not cut into the original. Finish with strips of sandpaper pulled under your thumb (light pressure!) over the patch until everything is level. It will be OK to take a little of the original and the very end to level everything up.
You can experiment with mixing in stain to color match with your glue and sawdust mix, but I find lacquer pens afterward are easier to get a color match.
You will want a base coat of clear lacquer so you have an even absorption of your stains. When the base coat dries, I hit it with fine steel wool.
Stewart McDonald or WoodCraft online both sell color matching pens. Sometimes I need to use alternate applications from a couple of different pens to get the color right.
I see some stain shading in your picture and that is your friend. get a little artistic to blend with the shading. Use a lighter shade lacquer pen and use more coats to darken where you need it.
Once the color is blended cover it with clear again. Multiple super light coats. No tackiness in the last layer before you apply the next. This step should never build up a "wet" layer. That may cause your color matching to run or smear.
If you want to see videos of these techniques, look on the Steward McDonald retail and YouTube sites. Their master luthier, Dan Erlewine has a more videos than Larry Potterfield.
I learn it from watching these vids.
Last edited:
Djfan
Well-known member
As an update, I don't have the chip. One of the joys of my son's diagnosis is that he hides things from everyone. I didn't know that it happened for a few weeks.
Similar threads
- Replies
- 18
- Views
- 1K


